Rendergraphs and how to implement one
If the renderer can prove that some commands for the GPU have no effect on the final image, it will not send these commands to the GPU, and it won’t even record these commands. Code that is not run is the best code, after all…
But how can a renderer achieve this?
By using a rendergraph. Organising potential GPU work in a rendergraph gives a renderer an amazing amount of information to do work with: In Island, the renderer I’ve been working on for a little while now, a rendergraph is used to sort, optimize, synchronize, and queue up work for the GPU. It allows the renderer to reason which payloads to record and to execute, to infer extra synchronisation steps, and even to distribute work onto multiple GPU hardware queues, whenever possible.
I’m going to spend a bit of time explaining how I implemented Island’s rendergraph. It’s an immediate mode rendergraph: every frame, it is rebuilt from scratch. A key design goal therefore was to make it lightweight, and predictable in terms of execution time. What I came up with is by far not the most elegant, or the most innovative use of a rendergraph, but it works nicely, and some architectural decisions turned out to pay off quite well, and I’ll be trying to highlight these.
One such thing that I quite like is that, to show what’s going on, and to help debugging visually, Island can automatically draw diagrams of the rendergraph for each frame.
Imagine a situation where we have a compute pass updating some vertices in a mesh, which is then drawn to screen. Here’s how such a rendergraph might look like:

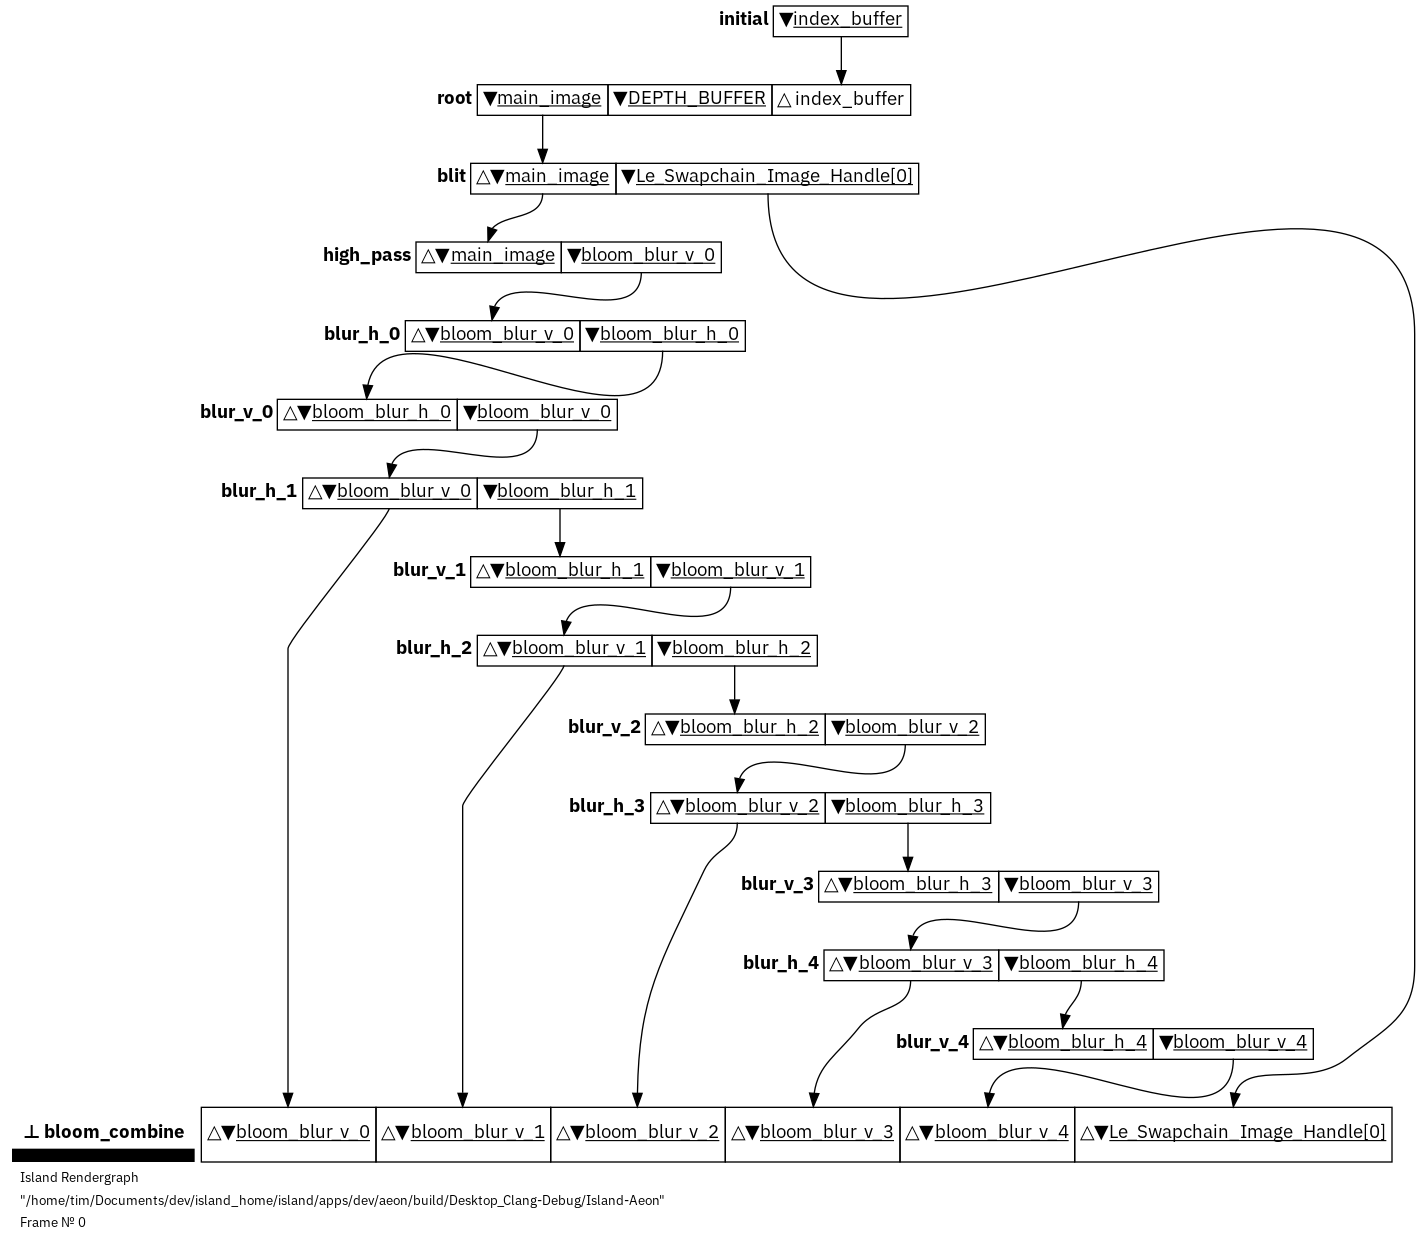
The rendergraph is a directed, acyclical graph (DAG) with vertices made from renderpasses. The graph’s edges are formed by read/write dependencies between resources inside these renderpasses. We can see this a bit better when we look at a diagram of a more complicated rendergraph:

a more complex rendergraph with many renderpasses, most of them here contributing to create a bloom effect. Time progresses top-to-bottom
In Island, forming the vertices of the rendergraph, renderpasses are the smallest isolated unit of reasoning about GPU operations. Everything GPU- related must happen inside of a renderpass. And each renderpass must choose upfront which capability it requires from the GPU. Currently, it must choose one of: GRAPHICS, COMPUTE or TRANSFER. Additionally, every pass must upfront declare which resources it uses, and for each resource, whether it will access it READ_ONLY, WRITE_ONLY, or READ_WRITE. In code this could look a bit like this:
Rendergraph Declaration in Code
|
|
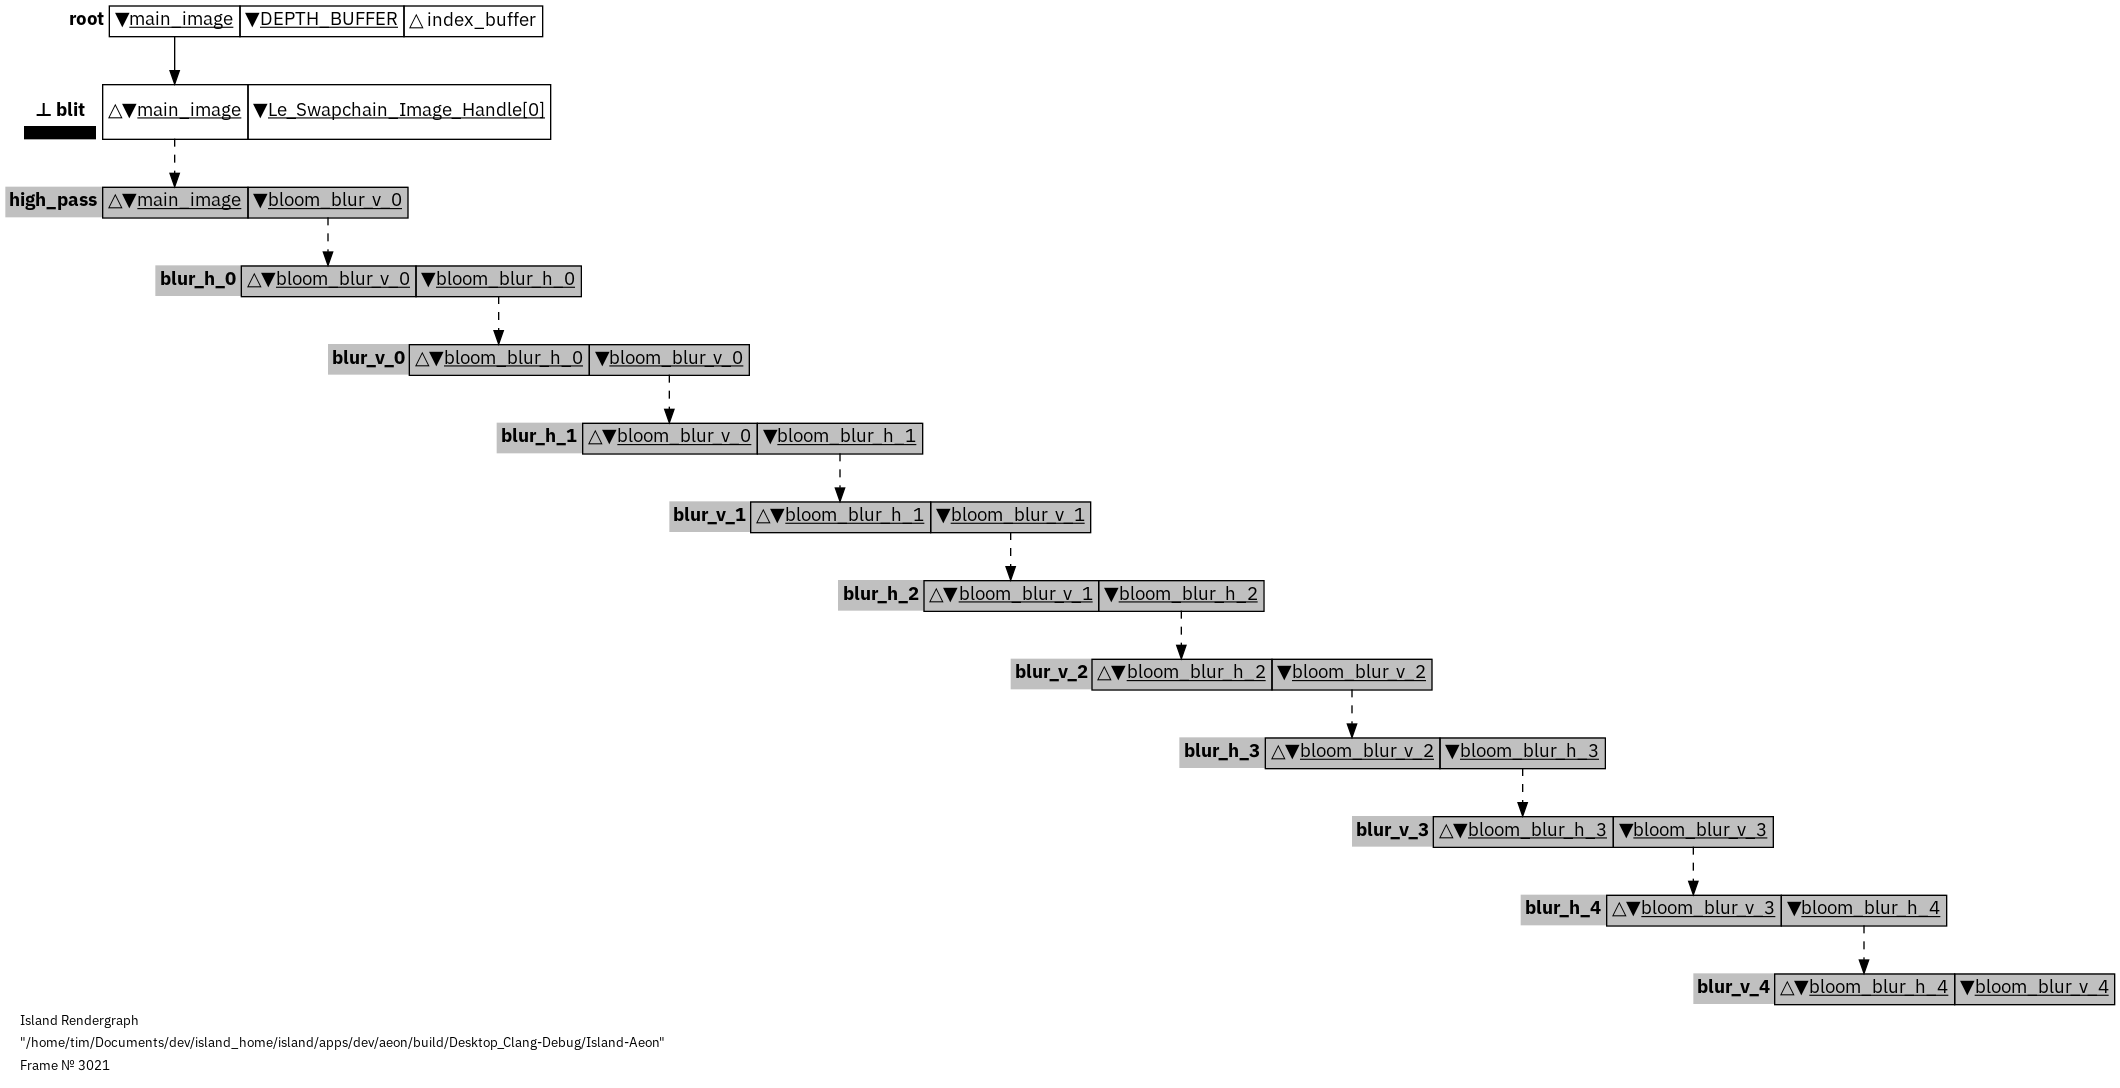
Note that each pass contains a callback method which contains commands that get recorded for the GPU. These commands are only allowed to touch GPU resources which were declared to its pass. If the pass contributes to the final frame, then the callback gets called by the renderer. If, however, the renderer can prove that a pass makes no contribution to the final frame, the pass is not executed, and its commands are not even recorded for the GPU. This can save a lot of CPU and GPU work.

A rendergraph where the renderer could prove that a large number of renderpasses do not contribute to the final image. They are grayed out in the diagram to show that they will be ignored.
When the renderer evaluates the renderpass, it only keeps passes which are linked to a pass that contributes to the final image on screen. How are these links formed? They are formed by the resources that are used inside each pass, and their usage – remember, for each pass we needed to declare which resources it reads, writes, and read/writes to. If a pass reads from a resource, the pass is automatically linked to the next earlier pass - in submission order - which writes to this resource.
Compared with other rendergraph implementations, Island does not re-order passes. Once the list of renderpasses for the current frame is submitted to the renderer, graph assembly begins at the bottom of this list, and bubbles upwards searching for links. The renderer might ignore passes, or even generate independent sub-graphs, but it will keep pass execution order in submission order. I made this choice early on, because it looked less complex to implement and maintain, and easier to reason about - it also makes it a bit more predictable, and quicker, to build the rendergraph.
Building the rendergraph
Before I go into a bit more detail about the individual steps for building the rendergraph, let’s list them as a broad-stroke recipe:
- Filter passes by testing if they contribute to any root pass
- Build independent sub-graphs beginning with each root pass
- Test for sub-graph overlaps, and merge overlapping sub-graphs
1. Filter passes by testing if they contribute to a root pass
We begin our recipe by filtering for root pass contributions. What’s a root pass? A root pass is a pass that we unconditionally want to keep. A classic root pass is any pass that writes to a swapchain image. To never drop such passes, we automatically declare the last passes that write to any swapchain images as root passes. It’s also possible to explicitly tag passes as root passes. This is useful, for example, when you want to spread work over multiple frames, where the results of a pass might only be used in the next frame.
Once we have our root passes, we know that we can get rid of any passes which are not linked to any of them. To perform this filter, we start at the bottom most root pass, from which we bubble up through our list of passes, all the while tagging any passes which have links to any root pass as contributing. Once we have reached the top of the list, any passes which have not been tagged as contributing can be discarded.
2. Build independent sub-graphs beginning with each root pass
Then, we revisit our list of passes again, and now, we tag each pass with the root pass(es) that it contributes to, so that we can form independent sub-graphs, each with a root pass at its, well, root.
Again, we begin at the bottom-most root pass, and note all the resources that get read by this pass. Then we iterate upwards in our list of passes until we find a pass which writes to any of these read resources. If we find such a pass, it is tagged as contributing to that particular root pass.
We add the read resources of our contributing pass to our current set of monitored read resources and continue our iteration upwards, until we find the next pass which writes to any of these read resources. If we find such a pass, it too contributes to the current root pass and we add a matching tag to it.
We repeat this process until we have reached the top of our list of passes, at which point we return to the bottom to find the next root pass, from which we bubble up again, until we run out of root passes to process.
How is this implemented in detail? I’m using bitsets to keep track of resource reads/and writes - it seems an effective way of testing many read- and write operations at once, as we can perform 32 comparisons or more with a single CPU instruction.
First, we map each resource to a unique bitset index. Then, for each pass we initialize two bitsets - one for writes and one for reads, and we switch on the bits representing writes and reads for the resources which are in use by this pass. Then, we execute the recipe from above.
|
|
In the above example we can see that there is a dependency between pass 2 and pass 0, because pass 2 will read from resource 0, which is written to by pass 0.
There is, however, no dependency to pass 1, as pass 1 does not write to any resources which are read in pass 2. We can therefore ignore pass 1.
This method is of course far from perfect, as it’s generally pessimistic: it assumes that all read resources conspire to modify all write resources in a pass - this might not always be the case. But this method seems to hit the right balance between complexity and usefulness for now. I might revisit this later if it needs further optimisation.
Tagging a passes’ contribution to a particular root pass works similarly: each pass stores a small bitset which is just large enough to have a single bit representing each distinct root pass. We tag a pass as contributing to a root pass by flipping the bit representing that root pass. This means that at the end of this process, we end up with a list of passes, where each pass has a key where at most a single bit is set, representing which root this pass contributes to.
With such a key, we can filter our initial list of passes for any passes which contribute to a root, giving us a subgraph of only the passes which contribute to this particular root pass.
Are we there yet? Not quite - we need one last step so that we can guarantee that subpasses are truly independent and could even run in parallel on different queues.
3. Test for sub-graph overlaps, and merge overlapping sub-graphs
For passes to be absolutely free of resource contention, we must guarantee that there never is any resource which is read by one subgraph, and written by another subgraph. If all sub-graphs just READ a resource, that’s fine.
What hazards do we need to look out for? Imagine that a downstream root pass writes to a resource, and an earlier pass reads from this same resource. After executing the algorithm above, we might still have two independent subgraphs:
|
|
To fix this, we need to test all subgraphs for whether their accumulated reads and accumulated writes overlap. If they do, that means that these two graphs are not independent, and that we must merge them. By merging subgraphs, we enforce that all their passes get executed in declaration order, and not, potentially, in parallel. This is important for when we want to spread workload over multiple parallel hardware queues.
So how do we merge two or more subgraphs? We can do this by simply combining (OR-ing) their keys.
Handing it over to the backend
When the renderer hands over the rendergraph to the backend, it provides it with the original list of passes (minus non-contributing) where each pass has a key that shows the root pass that it contributes to. The backend also receives different set of keys, where each key can be used to filter for a distinct, independent subgraph.
|
|
Now, if you filter passes using subgraph keys you will get:
|
|
Closing thoughts
I hope the above discussion gives an idea how the rendergraph is built in Island. There are many aspects to the rendergraph – how it is used to automate synchronisation, the subtleties of mapping a rendergraph onto the Vulkan API, how the rendergraph is used to automatically distribute work over multiple hardware queues – which might be worth talking about in more detail but will have to wait for a future post.
In Island, the rendergraph is assembled from scratch every frame, which is why I try to keep the workload for assembling the rendergraph fairly light. It could be nice to evaluate the rendergraph only on change - and while this might lead to less predictable frame times and more complexity, there could be quite some optimisation potential in it, especially for scenarios where the rendergraph itself does not change too much -or not at all- between frames.

le_rendergraph.cpp, on github.
Further reading
Shout-out to Hans-Kristian Arntzen, whose classic post Render Graphs and Vulkan - A Deep Dive is indeed an in-depth discussion, and has been a great source for inspiration. His write-up also contains lots of ideas on synchronisation and how a rendergraph can help with that, something I ran out of space to touch upon in this post.
Tagged:
RSS:
Find out first about new posts by subscribing to the RSS Feed
Further Posts:
- Colour Emulsion Simulations
- Watercolours Experiments
- Vulkan Video Decode: First Frames
- C++20 Coroutines Driving a Job System
- Vulkan Render-Queues and how they Sync
- Implementing Bitonic Merge Sort in Vulkan Compute
- Callbacks and Hot-Reloading Reloaded: Bring your own PLT
- Callbacks and Hot-Reloading: Must JMP through extra hoops
- Love Making Waves
- 2D SDF blobs v.1
- OpenFrameworks Vulkan Renderer: The Journey So Far
- Earth Normal Maps from NASA Elevation Data
- Using ofxPlaylist
- Flat Shading using legacy GLSL on OSX