Vulkan Video Decode: First Frames
I recently wrote a video decoder & player module that uses the Vulkan Video decode API, and integrated it into my R&D engine, Island.
It can decode and play 14 1080p@50 videos comfortably and draw all that at 60fps, while only using the decode units of my GPU.
Unfortunately I can’t show a recording of this because the marine wildlife documentary video that I used for testing is non-free. But I can share a recording which shows locally sourced fauna instead. Behold Milo, the house cat, whose antics metaphorically mirror my development process:
It took a lot of tail-chasing to get there.
The Vulkan Video API is a pretty unwieldy concern, and if you ever felt that Vulkan was a “depth-first” (vs breadth-first) API, this sentiment will be even more fully realized when using Vulkan Video.
I’m using this post and probably some future ones to retrace my steps, in the hope that it will help me to better remember what I did, and that it might allow others to not repeat my mistakes.
Why use Vulkan Video?
I had wanted to write a Vulkan Video player almost ever since Vulkan Video was announced a couple of years ago. For Island it means that I could finally have a hardware-accelerated video player module that was self-contained. Vulkan Video Decode allows you to keep everything running on the GPU throughout, which I find elegant: it means probably best achievable performance, potentially lower memory pressure, maybe better latency – and definitely total control over resource synchronisation. But the low-level nature of the API made it difficult for me to understand and formulate a step-by-step plan.
On the surface of it, writing a video decoder and player (and integrating it into an existing engine) looks like a strange all-or-nothing proposition: After a couple of months of work digging through the thicket of the Vulkan Video API, video codec specs, and previous sins manifested in my own Vulkan framework code, there might be some images animating — or not.
Is the pain worth it? Maybe. But then, undeniably, Vulkan Video is there.
So, where to start this journey? Perhaps with a look at the lay of the land.
Literary Review
As of today (November 2023), I could only find a small handful of open source implementations and blog posts discussing Vulkan Video implementations in any detail.
There are some presentations (A Deep Dive into Vulkan Video, and Video decoding in Vulkan) recorded at Conferences - which are pretty thorough, but were pretty tough for me to parse - from the implied knowledge it seems that the intended audience for these talks are video decoding specialists first, and graphics programmers second.
I poked at the NVIDIA vulkan video example (which appears to moonlight as the official Khronos example, but doesn’t seem to have too many fans, and I coudn’t warm to it either; it seems to do too many things at once to be clearly instructive for a relative novice to video coding like me).
To find out more about Video coding in general, and h.264 video decoding in particular, there is of course no more accurate resource than the official h.264 spec, which is useful, and super detailed and verbose, and will tell you nothing about Vulkan Video.
This aspect is better covered by a few blog posts - Lynne’s blog post discusses how Vulkan Video compares to other hardware accelerated decoder APIs; while János Turánszki probably wrote the most comprehensive post so far (and the only accessible open-source implementation and integration into a game engine that I could get my hands upon). It describes how he brought Vulkan Video to Wicked Engine, touches upon demuxing, creating video sessions, managing the DPB, etc.
In case you wonder what a DPB is and if you should care, I believe Daniel Rakos of rastergrid.com wrote one of the best intros to video coding that I could find, where all these things are explained.
A Way In
While János’ blog gave me courage, Rastergrid’s blog showed me a promising crack in what looked like an intimidating all-or nothing API surface: The first frame of a video will usually be an I-frame, and an I-frame can be decoded all by itself. This bears repeating:
"The first frame of a video will usually be an I-frame, and an I-frame can be decoded all by itself."
Why is that important? Usually, in video decoding, frames are decoded based on previous frames and previous decoder state, and implementing this all in one go would mean a massive leap of faith.
Had I started by writing a full video player straight away, so many things could have been subtly wrong at the same time that the situation would have been un-debuggable, simply because I wouldn’t have known what correct dynamic states to expect.
Since the first I-frame depends on no previous state, we have a way to simplify radically: instead of allowing the decoder to progress, we reset it and decode only the first frame over and over again, until we know that everything worked as expected. This gives us a first test and experiment, and one that is easy, and reliable to reproduce, because it is essantially stateless.
Instead of starting with a video player, I’m starting with a hardware accelerated frame decoder.
The Lure of The Mythical First Black Triangle
Now that we have identified the mythical first black triangle of video decoding, we know our first goal: it is to see that first I-frame decoded.
On screen, we will only see a single frame, the first frame of the video. It won’t move. But if this frame displays - or becomes visible in a frame debugger, we know:
- Loading the video file works
- Demuxing the video file works
- Uploading slice data to GPU buffers works
- Setting up a video decode queue works
- Setting up a decode session works
- Decoding the frame works
Once we can see this first I-frame, we are at about half-way to having a working video player. But to get to this point, we have to implement all the things listed above, in about the order listed.
So, let’s start writing some code.
1. Load the Video File
Nothing fancy to see here. I got lazy and slurped the whole .mp4
file (all 500kb of it) into a std::vector<char>.
2. Demux the Video File
This byte-array can’t be directly mapped to GPU memory, however, as the Vulkan Video decoder expects only raw video frame data, and the mp4 file (our byte-array) contains this data muxed (interleaved) with stream data (such as audio, subtitles, etc).
To extract video slice data, I then followed the steps outlined by János in his blog post on bringing Vulkan Video to Wicked Engine. I’m using minimp4, just like him. Minimp4 is a minimalistic header-only, C-library to demux mp4 files, released into the Public Domain, and a perfect fit for a c-ish engine.
Foreman
As a bonus, minimp4 comes with a test video of an enthusiastic foreman gesticulating at a building site, which I enthusiastically used for the initial bringup. It is a useful file to keep around.

Media Analyzer
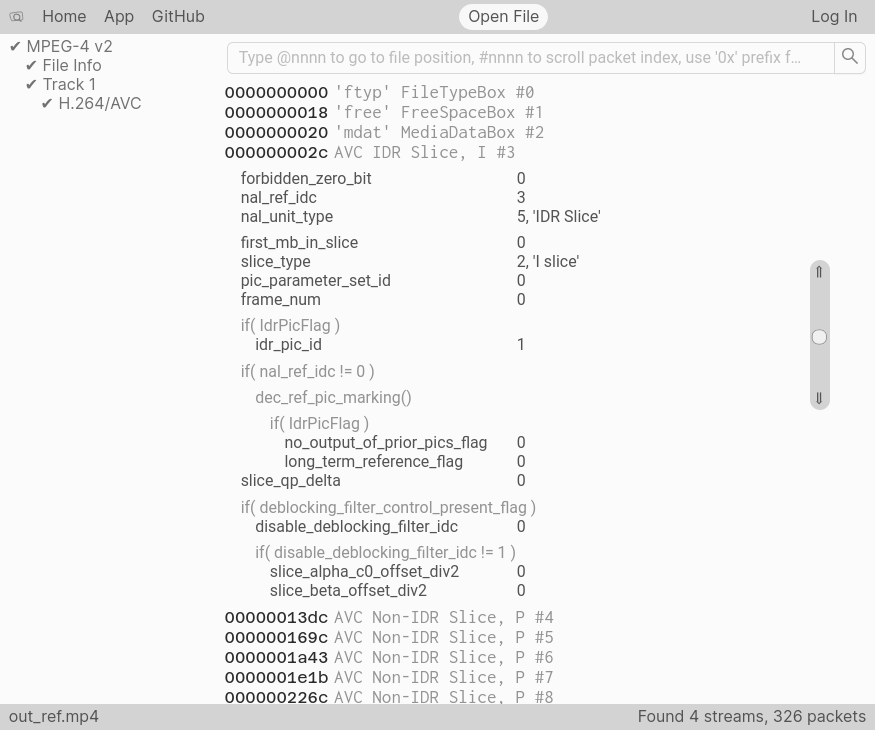
To test whether demuxing and parsing worked, I compared the output from the debugger with what I could find out about the test file by dropping it onto Media Analyzer. This little wonder is a local web app (it doesn’t upload any video data as far as I can tell) which allows you to inspect the structure of an mp4 file: https://media-analyzer.pro/app

0000002c in the file, the I-Frame begins.
Its nal_unit_type of 5 means it’s an IDR Slice, which stands for ‘Immediate Decoder Reset’ - which means: No previous decoder state to consider, reset everything to a blank slate before decoding this frame.
3. Upload slice data to GPU buffers
For uploading video slice data to the GPU, I initially took
a shortcut: I uploaded all the slices (that is all the raw video
data) onto one big host-mapped GPU buffer. I made sure that the
individual slices were properly aligned at boundaries, according to
what the driver reported for VkVideoCapabilitiesKHR as
minBitstreamBufferSizeAlignment, and
minBitstreamBufferOffsetAlignment. Respecting these offsets is
important, but fortunately the Vulkan Validation layers will pipe up
if you mess up here.
Speaking of validation layers: these are some of the best things about Vulkan. They are effectively a very comprehensive suite of unit tests that comes at a very fair performance cost, and you should switch them on whenever you’re running in debug.
4. Set Up a Vulkan Video Decode Queue
The next bit of work, setting up a video decode queue, was already taken care of by Island, where I can require a pass to be a video decode pass, and the engine will set things up accordingly. Because Video Decode is an extension to Vulkan, we must make sure that it (and other extensions that it depends on) are loaded when we initialize the Vulkan backend.
To this effect, I added a global init() method to my video player
API, which users of the video player must call before instantiating
an Island app that wants to use the video player module. init()
then adds to the shopping list of extensions and capabilities (and
queue capabilities!) required from the Vulkan backend, so that when it
is initialized, it can ensure to match all there requirements, or bail
out.
|
|
Video Player API Surface
Maybe this is the point where I should talk a little about the API surface of the video player. Here is the minimum viable video player API that I came up with.
|
|
A few things are maybe worth pointing out:
create()will attempt to load the file given by the path and will return anullptrif it was not successful. This means that if the file could not be found or opened, you don’t get a video player.update()does most of the heavy lifting. You are only supposed to call this method once per video player per frame, and ideally before you refer to the latest available frame for anything.get_latest_available_frame()gives you an image handle holding the currentmost image (after callingupdate()). The image handle is yours- but only for the duration of the current render frame.play()doesn’t do very much, it just changes the playback state of the video player. There are also methods to set the state topause()and to query the playback state, but I have left these out here for brevity’s sake.
6. Decode a Frame
After this little aspirational interlude, let’s focus back on the arguably most important function call of this exercise. It looks deceptively simple:
|
|
The devil is of course in the &info. And he is of a rather bureaucratic disposition: Even in its simplest form, we must fill in quite a lot of structs. That can get complicated pretty quickly.
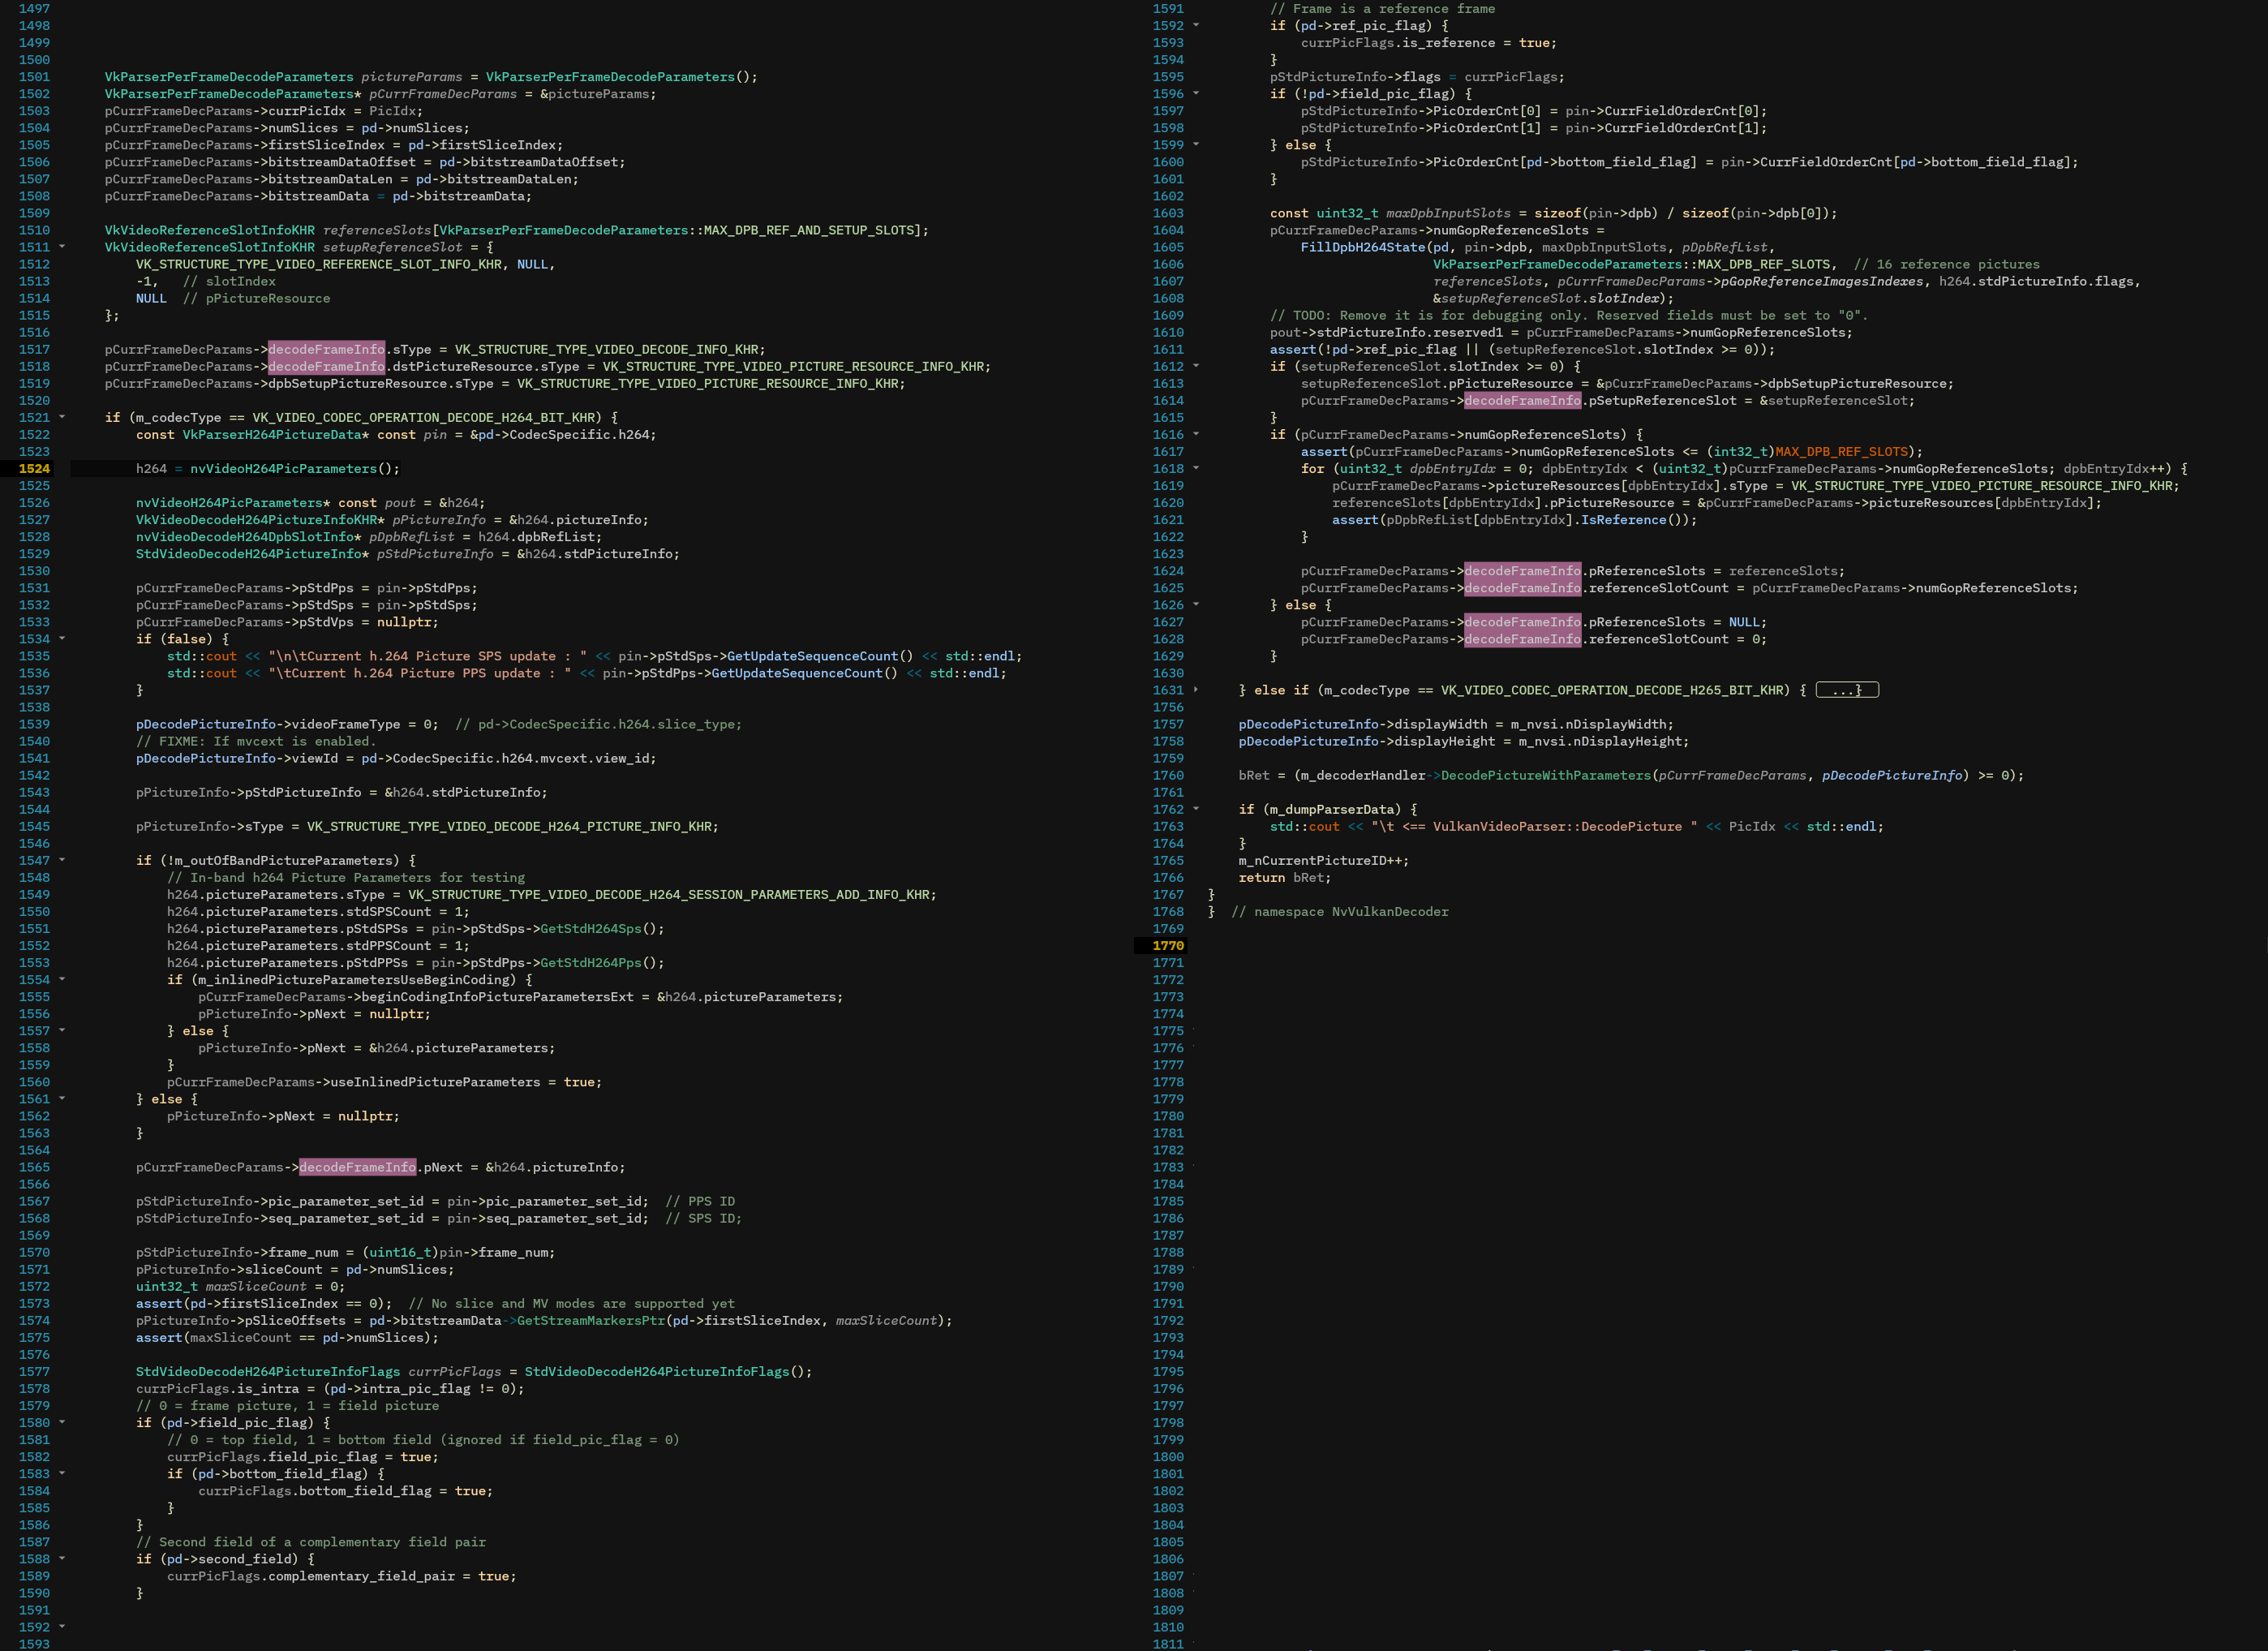
To wit, here is a screenshot which shows how the Nvidia Video Decoding example
sets up its VkVideoDecodeInfoKHR. The pink highlights show where the struct
is accessed, and it becomes clear that you will have to keep a lot of things in
your head at the same time if you want to follow this code.

DecodePicture function of the NVIDIA Video Decoding example implementation. This code does a lot of things at once.
The pink highlights mark assignments to the VkVideoDecodeInfoKHR struct.
Fortunately there is a way to make this a bit more legible. With C++20, you can almost achieve the legibility of C99 — by using the brand spanking new designated initializers. Here is how we could initialize this struct:
|
|
This looks prettier, but can get rather tedious to type out and transcribe, and since C++20 (in contrast to good old C99) requires the order of initializers to match field declaration order, you cannot omit any fields without risking to make things really fragile in the future.
To help with this, I wrote a little python script
which taps into the Vulkan SDK codegen infrastructure to generate
little struct scaffolds on-demand, and from inside an interactive
window. This script comes with Island, inside scripts/codegen/, but
can be used perfectly well without it.
Anyway, back to our VkVideoDecodeInfoKHR. Note how I set anything
concerning Reference Slots to 0 or nullptr — this is because we
don’t care about any Reference Pictures for our initial attempt at
decoding the first I-Frame.
But we do, however, need to tell the decode operation where to store
the decoded Image, and for this we use an image view that we created
earlier for precisely this purpose. If we know its handle, we can set
up the dstPictureResource as follows:
|
|
5. Setting up a Video Decode Session
The vkCmdDecodeVideoKHR command above must happen inside an active Video Decode Session.
Creating the Video Decode Session object is fairly straightforward, but to use
it, the Session requires its own vkVideoSessionParametersKHR object, which is
positively humungous. It (and its dependent structures) is arguably the most
work to set up.
Fortunately, this is mostly typing work filling in the forms, pardon, structs for the SPS (Sequence Parameter Set) and the PPS (Picture Parameter Set). Minimp4 will have extracted these values for us — all we have to do is to transcribe these values into the appropriate Vulkan struct fields, which are generally easy to find.
The reason the parameter object is not directly compiled into the Session is that these parameters may change per-frame. Fortunately, this seems to happen only very rarely (at least in the few videos that I used for testing) so for decoding just the first frame we should be fine setting up the video decode session with just one parameter object.
Two things that tripped me up here:
- The very first time we use the video decode session (and only then!), we must explicitly reset it. This happens by recording a video coding control command into the decoding command buffer:
|
|
- If a video stream does not explitly set its chroma format (I’m
looking at you, Foreman), then the chroma format can be inferred from
the video’s video profile. Any profile smaller than
IDC_HIGHimpliesSTD_VIDEO_H264_CHROMA_FORMAT_IDC_420by default. Not checking for this will most likely set a default chroma format value of0which is incorrect, as0mapps toSTD_VIDEO_H264_CHROMA_FORMAT_IDC_MONOCHROME. This is pretty important, because while most other parameters are a bit forgiving, messing the chroma format up will cause the decoder to (silently) fail and you won’t see anything, not even strange artifacts.
Did it Work? Vulkan Query Will Tell
Once we have everything set up, we need to somehow be able to tell if everything worked okay. We could assume everything worked and go ahead and implement the infrastructure to display the image on screen, but that would need some extra steps (synchronisation, mostly, and queue ownership transfers). These extra steps are extra opportunities for things to go wrong, and so for now we’d just be happy to know that somewhere in GPU memory there sits a correctly decoded image.
Now, without seeing the image, how can we tell whether decoding went
well? Query and you shall be returned an answer: we just have to ask
nicely. There is a special VkQuery that can be used to interrogate
the result of a vkCmdDecodeVideoKHR command. If the query reports
anything other than success or times out, we know something went
wrong. If it reports success, then we know all’s well, and we should
have a correctly decoded image somewhere.
To issue queries, you must first create a query pool, from which queries can be allocated. We only need one query per in-flight frame: Once the frame decode command and its query have finished executing on the GPU, you can read the result of the query and re-use it.
|
|
Note that the query pool must be initialized with a pointer to your video profile info - a lot of the Vulkan objects allocated and associated with video decoding need to know about this info, and it’s best to keep these around. I store these setting objects with the decoder, so that they are available for the full lifetime of the decoder.
|
|
Once we have a query pool, we can associate a query to each frame that
we will decode. Just before the call to vkCmdDecodeVideoKHR() we
record a command to reset the current query, then begin the query, and
end it after the decode command. Once a frame has reached its
VkFence (meaning all its GPU operations have completed) we can read
the result of the query via vkGetQueryPoolResults.
I Spy, I Spy … Nothing
It took a little while to get this far, and eventually, I managed to
get the Query to report VK_QUERY_RESULT_STATUS_ COMPLETE_KHR — in
other words: success!
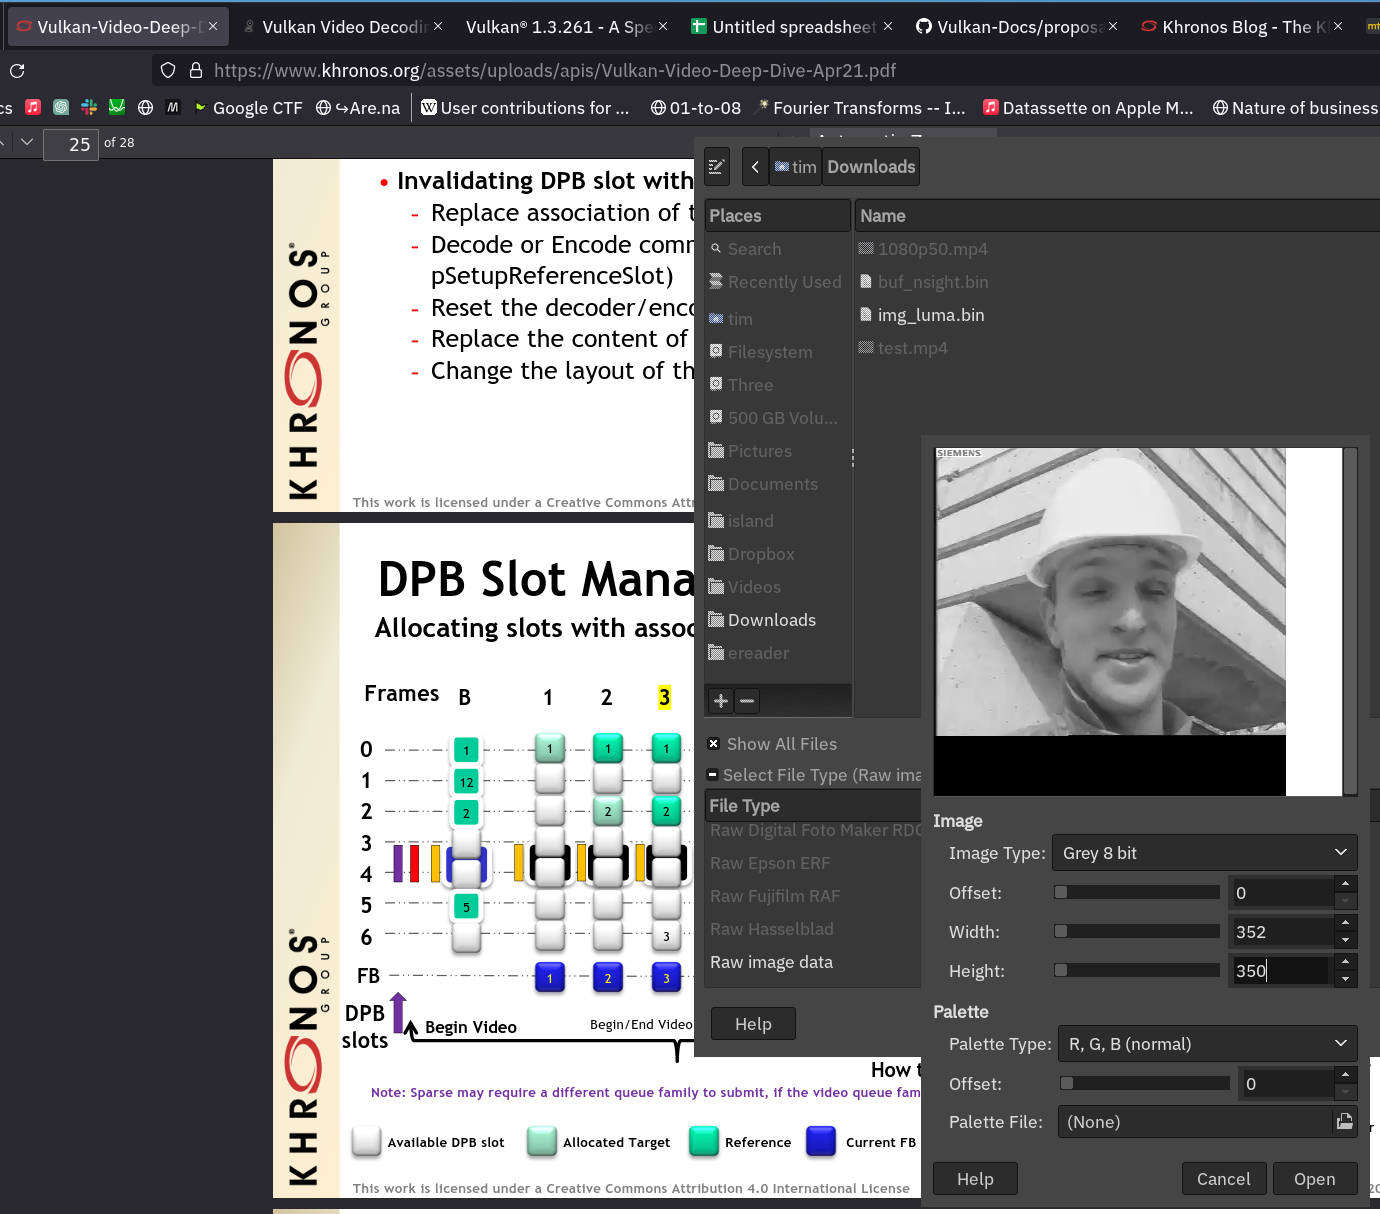
Time to take a frame debugger (Nvidia NSight in my case) and look at the image. But, alas, I could not get it to display the decoded image. I could, however, look at the raw data, and what I saw didn’t look like random leftover bytes — promising.
I saved the raw image data to a .bin file and imported it into GIMP.
A little bit of fiddling with the import settings, and … voila:

Why did I not see anything in NSight? It seems that NSight only allows
you to view image previews for images that have been created with the
usage flag VK_IMAGE_USAGE_SAMPLED_BIT set. That’s what I forgot to
do. Once I created my images with this usage flag, I could even see
them in NSight.
A look ahead
Drawing the Rest of the Owl means integrating the Video Decoder into the existing engine, and implementing playback logic — another long and winding road. There will be a few nice things worth visiting upon: Frame-based sync! Inter-queue sync! Integration with the rendergraph! Seamless loop and transport! Hardware-accelerated YUV sampling!
But this post has already grown very long indeed, and this will have to wait until another time…

Video Coding: Coda
For now, to me, even though slightly less mystified, video coding still appears a strange beast. The practice seems often done deep inside corporations, or at some dark murky depths, and on the surface, all that hints at the hardship and toil going on below is the occasional wail of desperation that tries to reach up to the light above.
But what joy it is to see the first frame decoded, and arriving at that first stepping stone. What joy!
Tagged:
RSS:
Find out first about new posts by subscribing to the RSS Feed
Further Posts:
- Colour Emulsion Simulations
- Watercolours Experiments
- C++20 Coroutines Driving a Job System
- Vulkan Render-Queues and how they Sync
- Rendergraphs and how to implement one
- Implementing Bitonic Merge Sort in Vulkan Compute
- Callbacks and Hot-Reloading Reloaded: Bring your own PLT
- Callbacks and Hot-Reloading: Must JMP through extra hoops
- Love Making Waves
- 2D SDF blobs v.1
- OpenFrameworks Vulkan Renderer: The Journey So Far
- Earth Normal Maps from NASA Elevation Data
- Using ofxPlaylist
- Flat Shading using legacy GLSL on OSX